SDL Studio to Trados Legacy Converter

Scenario: You use Studio but your providers still use Trados 2007

Suppose that you use SDL Trados Studio but your providers still use Trados 2007 or other CAT tools. Well, a few months ago, you would have been obliged to take a step back and to prepare your project in Trados 2007. Downgrading to Trados 2007 would imply exporting the TM from Studio, probably loosing segments on the way, and getting a lower leverage due to segmentation or tag issues. But here’s the perfect workaround!

A new App has recently been released on the SDL OpenExchange platform: SLDXLIFF to Legacy Converter.  You can download it here. Thanks to this very useful tool from Logos you can convert your Studio SDLXLIFF files to four different bilingual formats: bilingual .doc, bilingual .docx, .ttx and .tmx. Your providers can now use Trados 2007 or other translation environments to translate your Studio projects. Once you receive the translated files, you just need to import them into your original SDLXLIFF files. Thanks to this tool, we can say that finally Trados 2007 and Studio are (almost) completely compatible with each other.

Let’s see how it works.

STEP 1: ADJUST THE SETTINGS

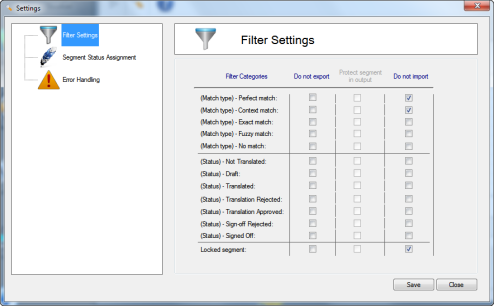
Under Tools > Settings, decide which segments you want to export and import (Perfect matches, Context matches, etc.).


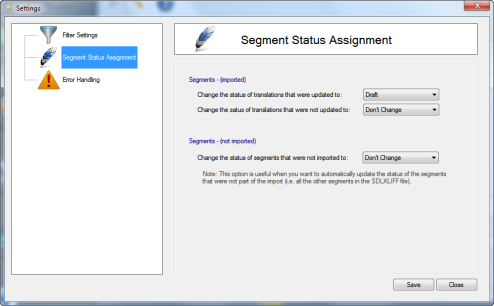
And define which status the imported segments should adopt after the import process (draft, approved, etc).


STEP 2: LOAD SDLXLIFF FILES AND EXPORT THEM TO THE FORMAT OF YOUR CHOICE

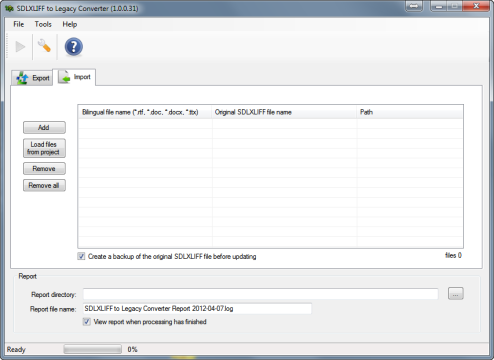
You may load files or complete Studio projects. Then, choose the target format in the drop-down list (bilingual .doc, bilingual .docx, .ttx or .tmx) and click on Start Processing.

STEP 3: GET YOUR BILINGUAL FILES TRANSLATED

Bilingual .doc and .docx can be translated under Trados 2007 or using Wordfast Classic for instance, TTX files are supported by many Cat tools, such as TagEditor, MemoQ, Wordfast Pro and many more, .tmx files are based on XML and could be translated in many CAT tools or in TMX editors, such as Olifant.

STEP 4: CONVERT THE TRANSLATED FILES BACK TO SDLXLIFF

Use the Import tab to load the bilingual files you received from your providers and click on Start Processing to import the translation into the original SDLXLIFF files.

You can now proceed to review the files, to update your Studio TM or to finalize your project as usual.

Studio 2011 SP1 & Trados 2007 bilingual files – Part IV

After explaining in my previous posts how to adjust the compatibility settings for TTX, how to handle bilingual .doc files in Studio, how to deal with TTX files in Studio, let’s have a look at a last scenario.

Scenario 3: Client sends new source files and wants translated files and TTX files back

No need to say that you could create TTX files using Trados 2007 and follow Scenario 3 as explained in my last post but my intention here is to present a new working method introduced thanks to the SDL OpenExchange program. OpenExchange is an initiative launched by SDL to promote the development of Apps able to add new functions to SDL Trados Studio. Most of those Apps are free and some of them are now fully integrated in Studio “from factory”. The platform offers many useful plug-ins: TM & format converters, a batch search & replace applet, multilingual dictionaries, etc. One of the most important App is, no doubt, SDL TTX IT which batch converts files to TTX format without having to use Trados 2007.

Suppose that your client sends you source files and wants translated files and TTX files. SDL Studio now works with .sdlxliff files (and not TTX as in SDL previous versions). Nevertheless, TTX format is still one of the most widely used formats by LSP’s. Well, here is a quick workaround to create TTX files. After translation in Studio, you can easily return TTX files to your client using this workflow:

STEP 1: BATCH CONVERT SOURCE FILES USING SDL TTX IT

1. Open TTX IT from the Start menu under SDL > SDL Trados Studio 2011 > OpenExchange Apps > SDL TTX IT.

2. Select the source language in the Source language box.

3. Click on Filters to adjust the settings according to the files you want to convert.

Note: Only the formats supported by Trados 2007 are supported by TTX IT. Examples of formats not supported: FrameMaker MIF, InDesign IDML, Office 2010 files, etc.

4. If you need to convert a file associated to an INI file, load the INI file pressing the INI Files button. The usual Trados 2007 Tag Settings window displays.

Note: If you use INI files to create the TTX files, you will have to create new file types in Studio based on those INI’s to display correctly the files in Studio.

STEP 2: SELECT THE COMPATIBILITY SETTING FOR TTX

In this step, decide whether you want to use smart tag pairing or full compatibility mode for TTX files and define the tag verification settings for TTX. If you don’t know how to proceed, see my previous post to learn how to change the compatibility settings for TTX.

STEP 3: TRANSLATE YOUR TTX FILES IN STUDIO 2011

Translate in Studio as explained in my post on how to deal with TTX files in Studio.

STEP 4: SAVE THE TRANSLATED FILES

1. Select File > Save Target As from the Studio menu to generate the target translated document for a single file. Select TRADOStag Document in the following dialog box. The result is a fully translated TTX file.

2. If you are working with a project, select Project > Batch Tasks > Finalize from the Studio menu. The Finalize task generates TTX files in the target folder of your project.

3. Deliver the completed TTX files to your client.

For more complex scenarios, please see how to deal with TTX files in Studio.

CONCLUSION:

Thanks to this workaround, you can quickly create TTX files from source files, take advantage of all the Studio functionality, such as Autosuggest, auto-propagation, etc. and deliver TTX files and translated files as requested by your client.

SUMMARY:

Here is a summary of all the possibilities and the workflow to use for all the scenarios and cases we have seen in my last four posts on Studio 2011/Trados 2007 interoperability.

Studio 2011 SP1 & Trados 2007 bilingual files – Part III

After explaining in my previous post how to handle bilingual .doc files in Studio, we will now see how to handle TTX files in this second scenario.

Scenario 2: Client sends TTX files and wants TTX, translated files in their original format and Trados 2007 TM back

Studio 2011 provides full support for TTX files, so you can easily return TTX files sent to you after translation in SDL Trados Studio. Here is the workflow to follow:

 STEP 1: CREATE A TM IN TRANSLATOR’S WORKBENCH (OPTIONAL)

If the client did not provide a Trados 2007 translation memory (.tmw) and you have to deliver one or if you want to keep a Trados 2007 TM for your records, the first step is to create one using the requested source and target languages in Translator’s Workbench. If the client provided an exported TM (.txt), import it into your newly created TM.

STEP 2: SELECT THE COMPATIBILITY SETTING FOR TTX

In this step, decide whether you want to use smart tag pairing or full compatibility mode for TTX files and define the tag verification settings for TTX. If you don’t know how to proceed, please be sure to read Part I of this tutorial.

STEP 3: TRANSLATE YOUR TTX FILES IN STUDIO 2011

Open your file in Studio or create a project if you have several files. If you received a Trados 2007 TM, create a new Studio file-based TM upgrading the TM (.tmw) you received from the client or the one you created in Step 1. A legacy TM will be upgraded to a Studio TM (.sdltm). The upgrading process creates a new TM based on the 2007 TM but it does not overwrite nor delete it. This way, you will be able to deliver an updated 2007 TM to your client at the end of the process. If you client didn’t send you any TM, create a new Studio TM from scratch.

STEP 4: SAVE THE TRANSLATED FILES

After translating the file(s), use one of the following procedures:

Case 1: Your client wants TTX files back only

1. Select File > Save Target As from the Studio menu to generate the target translated document for a single file. Select TRADOStag Document in the following dialog box. The result is a fully translated TTX file.

2. If you are working with a project, select Project > Batch Tasks > Finalize from the Studio menu. The Finalize task generates TTX files in the target folder of your project.

3. Deliver the completed TTX files to your client.

Case 2: Your client wants TTX files and translated files in their native format back

IMPORTANT: Be sure to have the source files used to create the TTX files and to place them in the target language folder of your Studio project.

1. Select File > Save Target As from the Studio menu to generate the target translated document for a single file. Select Original File in the following dialog box to get a fully translated file in its native format. Repeat this step a second time selecting TRADOStag Document to get a TTX.

2. If you are working with a project, open each file in the Editor view in Studio and save as Original File and as TRADOStag Document as indicated in the previous step.
Alternately, select Project > Batch Tasks > Finalize from the Studio menu. The Finalize task generates TTX files in the target folder of your project. Be sure to place the source files received from your client in the target language folder of your Studio project. Now, clean up the TTX files using the Trados 2007 TM received from the client or created during Step 1. Clean up process will convert TTX back to their original format and overwrite the source files.

3. Deliver TTX files and translated files in their native format.

Case 3: Your client also wants the Trados 2007 TM

Create the TTX files as explained in Case 1. Be sure to place the source files in the same folder as the TTX files. Finally, update the TM received from your client or the one you created in Step 1 by cleaning up the TTX files. Be sure to check the Update TM radio button in the Clean Up dialog box in Trados 2007.

Note: If you did not receive the original files used to create the TTX files, you might see an error displayed during clean up. In this case, you will only be able to deliver TTX files and the updated TM, not the translated files in their original format.

CONCLUSION:

Thanks to this workaround, you can now take advantage of all the Studio functionality, such as Autosuggest, auto-propagation, etc. when you translate TTX files.

Studio 2011 SP1 & Trados 2007 bilingual files – Part II

Studio 2011 now integrates a bilingual Microsoft Word file filter, which offers the possibility of working on and/or delivering bilingual .doc files.

Scenario 1: Client sends source files in Word format (.doc) and needs bilingual .doc and target .doc back

Here is the workflow to follow:

STEP 1: CREATE A TM IN TRANSLATOR’S WORKBENCH

If the client did not provide a Trados 2007 translation memory (.tmw), the first step is to create one using the requested source and target languages in Translator’s Workbench. If the client provided an exported TM (.txt), import it into your newly created TM.

STEP 2: CONVERT THE SOURCE FILES TO BILINGUAL FILES

Note: If the client sent bilingual files (pre-translated .doc files), you can skip this step.

1. If the Word files have not been pre-translated yet, convert them to bilingual files in Trados 2007. First, get sure to select the workflow for bilingual word files. Select Options > Translation Memory Options from the menu, select the Tools tab and get sure the checkbox here below is disabled. This will ensure the Word files are not converted into TTX files during pretranslation.

Image

2. Select Tools > Translate from the menu and get sure to select the Segment unknown sentences to ensure the files will be fully segmented even if no match is found in the 2007 TM.

Image

3. Click Add, browse for your .doc files, click Open to load them. Then, click Translate to convert them to bilingual files with the correct source and target languages. If your TM contains data, your files are also pre-translated.

Image

STEP 3: TRANSLATE YOUR BILINGUAL FILES IN STUDIO 2011

Open your file in Studio or create a project if you have several files and create a new Studio file-based TM upgrading the TM (.tmw) you received from the client or the one you created in Step 1. It will be upgraded to a Studio TM (.sdltm). The upgrading process creates a new TM based on the 2007 TM but it does not overwrite nor delete it. This way, you will be able to deliver an updated 2007 TM to your client at the end of the process.

STEP 4: GENERATE THE BILINGUAL .DOC FILES

After translating the file(s), use one of the following to convert the files back to the bilingual .doc format.

1. Select File > Save Target As from the Studio menu to generate the target translated document for a single file. The result is a fully translated bilingual .doc file.

2. If you are working with a project, select Project > Batch Tasks > Finalize from the Studio menu. The Finalize task generates .doc bilingual files in the target folder or your project.

STEP 5: CLEAN UP YOUR BILINGUAL FILE(S) USING THE TRANSLATOR’S WORKBENCH

Note: Make a copy of the bilingual files before cleaning them up and add the “_unclean” suffix to their name.

Clean the .doc bilingual files using Trados 2007 Translator’s Workbench. Select Tools > Clean Up. Select the Update TM option if you want to update your 2007 TM.

Image

Click on Add, browse for your bilingual files (the ones with the original name, not the ones marked “_unclean”) and click on Clean Up.

Image

Now you have:

– A backup copy of your bilingual files (called “_unclean.doc”). You could also have .bak files, which are basically the same.

– A copy of your target documents with no source (the “clean” files, with a .doc extension)

– The updated translation memory (.tmw)

We are all done! Just send the files requested by your client. Thanks to this workaround, you can now take advantage of all the Studio functionality, such as Autosuggest, auto-propagation, etc.

Studio 2011 SP1 & Trados 2007 bilingual files – Part I

In my daily work as a “CAT tool troubleshooter” (or “TEnT troubleshooter” as Jost Zetzsche would probably call it), I am realizing how hard things turn out to be when it comes to migrating from Trados 2007 to Studio 2011, even for the best  techies. I don’t know how well or bad sales are going for SDL but one thing is clear: since SDL launched its revamped translation suite in 2009, less than 0.5% of all the projects we received at our company had been created with Studio.

My perception is that Studio is underused among those who bought the Suite. From my experience, working on a regular basis with more than 100 worldwide LSP’s, I observe that most LSP’s keep using Trados 2007 as their main tool or directly switched to other tools (or are just about to do it). I have no idea if this is due to the high prices of the new SDL solutions, the strength of new competitors such as memoQ or to the resistance of the route Trados 2007 took. Maybe it’s due to a combination of all these factors but there is another one I personally encountered.

When I decided a few years ago to upgrade to Studio 2009, I immediately realized how complicated it was to work with the TTX files we were receiving from our customers. Moreover, 20-30% of the segments on average were lost during the TM upgrade process. After many trials, I decided to throw in the towel and to shelve my license sine die. I knew the program was excellent but it was incompatible with the projects we were receiving.

Now, with Studio 2011 SP1, things are much more different. Many compatibility issues have been solved and working with Trados 2007 files has become a little more straightforward and, even better, compatibility is really bidirectional, in the sense that TTX and translated files in the original format can now easily be recreated. With this last version, you can work directly on a pre-translated bilingual DOC or TTX file and send it back in that same format and as a clean file without having to refrain from using all the new and powerful features offered by Studio, such as the Autosuggest dictionaries or the auto-propagation.

Based on the scenario you come across, the workaround might be more or less tedious but now, at least, the time invested in conversions, imports and exports is worth it.

In this post and in the next few ones, I’ll try to consider from all angles how to manage TTX/Microsoft Word bilingual files according to the scenario you could face out. But first thing first.

A. TTX files, bilingual Microsoft Word files vs. SDL XLIFF files

When pre-translating files with Translator’s Workbench, Synergy or when opening files in TagEditor, the source files were converted to a bilingual format referred to as TTX (for TradosTag XML). With Microsoft Word files, you had also the possibility to keep working on bilingual DOC files directly in Microsoft Word, even though the DOC files were in reality “disguised RTF files”.

When you open a single file for translation or create a project in SDL Trados Studio, files are now converted to SDL XLIFF, a new generation of bilingual file, more powerful and flexible than TTX, based on the XLIFF standard created by OASIS in 2002.The good thing with XLIFF is that it was created specifically for the localization industry and that it is standardized, which means that (theoretically) all the translation software developers use the same computing language, which makes easier the data interchange between translation/localization tools. For more information on XLIFF, see my post on XLIFF.

B. Options for TTX support

Prior to working with TTX files in Studio and seeing the actual scenarios you might stumble over, you might need to change two settings: Compatibility Setting & Tag Verification Settings.

1. Compatibility Setting for TTX

SDL Trados Studio 2011 SP1 can work with TTX files using two modes:

Smart tag pairing mode or Compatibility mode

In the first mode, Studio will try to fix tags in the TTX so that they have an opening and a closing tag and become a “tag pair”. Standalone tags are not allowed anymore in Studio 2011 SP1: the program will insert an extra closing tag to ensure the integrity of the tag pair.  Studio will also attempt to preserve the semi-WYSIWYG formatting (“what you see is what you get”) from TTX (bold will be displayed as bold, italics as italics, etc.). This smart tag pairing approach will work in most cases but occasionally the back conversion to TTX may fail. If this happens, SDL recommends that you activate the compatibility mode for TTX. In this second mode, all the TTX tags will be displayed as placeholder tags (<cf>). Each tag in the TTX will correspond to one tag in Studio and no formatting preview will be shown in Studio.

This mode may affect the TM matching when tag pairs start or end outside a segment since an opening or closing tag will automatically be inserted and stored in the Studio TM. This will result in better leveraging across file formats if you keep working with a Studio TM.

On the contrary, if you work with a legacy TM originating from Trados 2007, compatibility mode will result in better reuse.

How do I know which compatibility setting to select?

Prior to starting working on the TTX files, test the TTX compatibility setting to determine whether to enable or disable smart tag pairing by doing a test with a representative TTX file from your project.

1. Click Open Document on the Standard toolbar to open the TTX file in Studio.

2. In the Editor view, press [Alt]+[Shift]+[InsCopy] to copy all the source segments to target segments in Studio.

3. Select File > Save As Target from the menu bar in the Editor view. Save the target version in its native format (original file format) and as a TRADOStag (TTX) file. This works for all file formats that are supported in SDL Trados 2007, including customizable file formats, such as XML or SGML. If you are working with SGML, you should import the tag settings files (.INI) in SDL Trados 2007 to ensure a smooth translation.


If saving both output file formats works without errors, you can use smart tag pairing mode. If not, disable smart tag pairing and use compatibility mode. You can also open the generated TTX file in SDL Trados TagEditor, use the Save Target As command to save it in its original format and review the document to ensure everything is OK.

How to specify your compatibility setting

1. Select Tools > Options.

NOTE: If you want to specify these settings only for the active project or active document, select Project > Project Settings.

2. Select File types > TRADOStag > Compatibility. The Compatibility settings are displayed on the right.

2. Tag Verification Settings

Specify your tag verification settings under Tag check and click OK to close this dialog box.

XLIFF format

Okapi Framework

Okapi Framework (Photo credit: Wikipedia)

XLIFF stands for XML Localisation Interchange File Format (current version is 1.2 and was released in February 2008). The good thing with XLIFF is that it was created specifically for the localization industry and that it is standardized, which means that (theoretically) all the software developers use the same computing language, which makes easier the data interchange between translation/localization tools. XML stands for eXtended Markup Language. The word “extended”, also found in XHTML, implies that anyone is free to make up new attributes or, in other words, to customize the tags. I could perfectly create a new kind of XLIFF with a customized tag called “transtutorial” that would display the strings to which I would apply it with the font Arial, 14 points, in red color and underlined, for instance.

As expected, many toolmakers took advantage of the extension possibilities of XLIFF to create slightly modified versions of the strict XLIFF standard and, now, to avoid compatibility issues, the XLIFF Technical Committee is currently trying to analyze and compile all those new features and to get the developing community to an agreement on the future XLIFF 2.0 Specification in order to give support to all the new features without using the extensibility, i.e. avoiding the toolmakers to invent their own attributes.

More and more translation tools that are developed nowadays support or are directly based on XLIFF (or a slightly modified kind of XLIFF). Many tools were created to check, manipulate or edit XLIFF files, such as:

  • XLIFFChecker (an open source tool that checks compliance of XLIFF files with the official standard published by OASIS)
  • XLIFFMerger (a free Java tool for merging and splitting XLIFF files).
  • Translate Toolkit converts various file formats to XLIFF and provides checking, filtering and manipulation tools for the format.
  • Okapi Framework provides multiple filters that generate XLIFF documents.
  • xliffRoundTrip Tool (an open source tool to convert a well-formed XML file into XLIFF and back to XML after translation)
  • QA Distiller (commercial QA tool that runs automated translation quality checks on bilingual files, including XLIFF files)
  • Verifika (commercial QA tool that runs automated translation quality checks on bilingual files, including XLIFF files)
  • ApSIC Xbench (a free QA tool for searching terminology and checking automatically the quality of many bilingual XLIFF files, among other XLIFF)
  • Benten (an open source XLIFF editor)
  • OmegaT (a cross-platform and open source CAT tool)
  • Pootle (a web-based localisation platform)
  • Heartsome (a suite of cross-platform CAT tools founded on open standards: XLIFF, TMX, TBX, SRX, XML, GMX)
  • Swordfish III (a cross-platform CAT tool that uses XLIFF 1.2 as native format)
  • Virtaal (an open source CAT tool)
  • Web Translate It (a web-based CAT tool)
  • XTM Cloud (a web-based CAT environment mainly based on XLIFF (1.0 through to 1.2).
  • MultiCorpora Prism XLIFF Editor (a desktop XLIFF editor to translate XLIFF files created with MultiCorpora Prism, an online CAT and project management tool)

For more information on XLIFF, see:

http://docs.oasis-open.org/xliff/xliff-core/xliff-core.html

http://developers.sun.com/dev/gadc/technicalpublications/articles/xliff.html

For more information on the future XLIFF 2.0 Specification, see:

http://wiki.oasis-open.org/xliff/XLIFF2.0

Translation Tutorials Manifest

If only I could have spent on a beach all the time I lost training new internal and external collaborators…

I can’t stand it anymore so I’ve decided to create video tutorials for every single process we run in our daily working life and to share them on a webpage called Translation Tutorials.

I invite everyone to share his knowledge, good links, good tutorials here or on the above mentioned page. Many of them will be free, some won’t. Some of them will be on sold simply because knowledge has its price.

If you want to take or build courses, joining our affiliate program, don’t hesitate to let me know and we’ll see together how we can help the translation community to learn new skills, new translation environments, or tricks & workarounds gathered over many years of experience.

Besides the webpage, I’ve also created:
– a channel on Youtube: translationtutorials
– a Twitter account: @TransTutorials
– an email address: info@translationtutorials.com
– a page on Facebook: Translation Tutorials

Spread the word and let’s see if we can get as much useful information as possible to address all our immediate needs in a few months.

My intention is not to criticize products on the market but to show how to get the most of them as quickly as possible mainly to help newcomers to the language industry, to reduce training time for translators, editors, proofreaders, localization engineers or project managers or training costs for LSP’s.